Showing posts with label DIY. Show all posts

Thursday, September 11, 2014

I Grow Wheat Grass for 17 Chickens for Less than 25 Cents a Day - Instructions

Last year I shared with you one of my fodder growing experiments.  It didn't turn out so well, but I continued to play with several of the factors that made it less then wonderful, such as the kind of seeds I would grow, the trays needed for optimum sprouting and ultimately grass growing, temperature and location of my trays, and finally the rotation schedule that would provide me with the exact amount of feed I would need every day for my hens.

All of my experimentation has helped me develop a master-plan that I would like to share with you.  I've been using this plan successfully for almost a year.  With this method I can grow enough Organic Wheat Grass to feed (as a supplement) to my 17 hens during the times of year when access to fresh grass is not an option...which is most of the year here in ArizonaI can do this for less than 25 cents per day!  This does not include the initial cost of my supplies however.  If you want the same supplies I used, I have included links to purchase these items online, below.


Beautiful Organic Wheat Grass in Various Stages of Growth

Here are the detailed instructions for my super-easy, proven method:


First, I bought Two (2) Victorio Seed Sprouter sets - that gives me a total of 8 round sprouting trays.   I have six trays in my rotation at all times and two trays are cleaned and ready each new day.


Next I bought the big trays I use for days 4 thru 9.  You will need Three (3) Large Trays Without Holes and Six (6) Half-Size Trays With Holes.  I bought an extra couple so I don't have to immediately wash out the tray emptied each day, but it really isn't that much of a chore.  I figured I could use the extras for my garden seedlings.  The reason I don't use these black trays from the beginning is because, until the seeds sprout, they can too easily fall thru the drain holes, and they also sprout better in the round Victorio trays in my opinion.  (Click the title under each image to be taken to the Wheat Grass Kit website to purchase the trays.)

Large Trays WITHOUT Holes

Small (10"x10") Trays WITH Holes
I use Organic Hard Winter Wheat Berries (seeds).  I purchase my seeds through a co-op bulk feed group here in Arizona for about $16 for a 25 pound bag.  If I run out before the next order time I also purchase them in the bulk section of my local natural grocery for $ .99 per pound.  Yes, I could buy it much cheaper at the feed store BUT, it wont be Organic, Non-GMO which is all I will feed my hens.  For less than 25 cents a day I am not concerned about the cost to purchase the best seeds possible.  I have also found through my experimenting that the standard bulk seeds which are not organic do not sprout as well so you are using lots more seeds and getting less growth...where is the savings in that?

Here is my routine:

If you start with Day 1 step (below) each day, by the time you get to the 10th day you will have a 10" x 10" patch of lush green wheat grass to feed your chickens.  Keep it up and you will always have a fresh batch daily from there on out.

1/3 Cup of Organic Hard Wheat Berries (seeds)


DAY 1: (and each morning thereafter)
Each morning you will be starting a new set of round trays.  Put 1/3 cup of wheat seeds in each of 2 round Victorio sprouting trays.  Rinse them thoroughly under cold running water, then allow to drain. The theory is "Flood & Drain".  After I rinse the new seeds thoroughly I put these two trays on the bottom of my existing stack of trays. (Note: when you first start you wont have an existing stack, but by day 2 you will.)

I place the whole stack of trays into the sink and slowly run cold water into the top tray, and allow it to run until all of the trays are full of water.  Then I lay the lid on top -but do not snap it down, if you do it can cause molding because they cannot drain.  While that is draining I rinse out the holding tray (that's the bottom white tray without holes).  Once the water has pretty much drained out of the trays, I put the whole stack (6 trays by day 3 and each day thereafter) on top of the white holding tray and place it on my counter out of my way.

In the evening I will 'flood and drain' all trays again.  The seeds should be rinsed approx every 12 hours, it's not exact, I do it in the morning, then sometime after dinner or before bed.
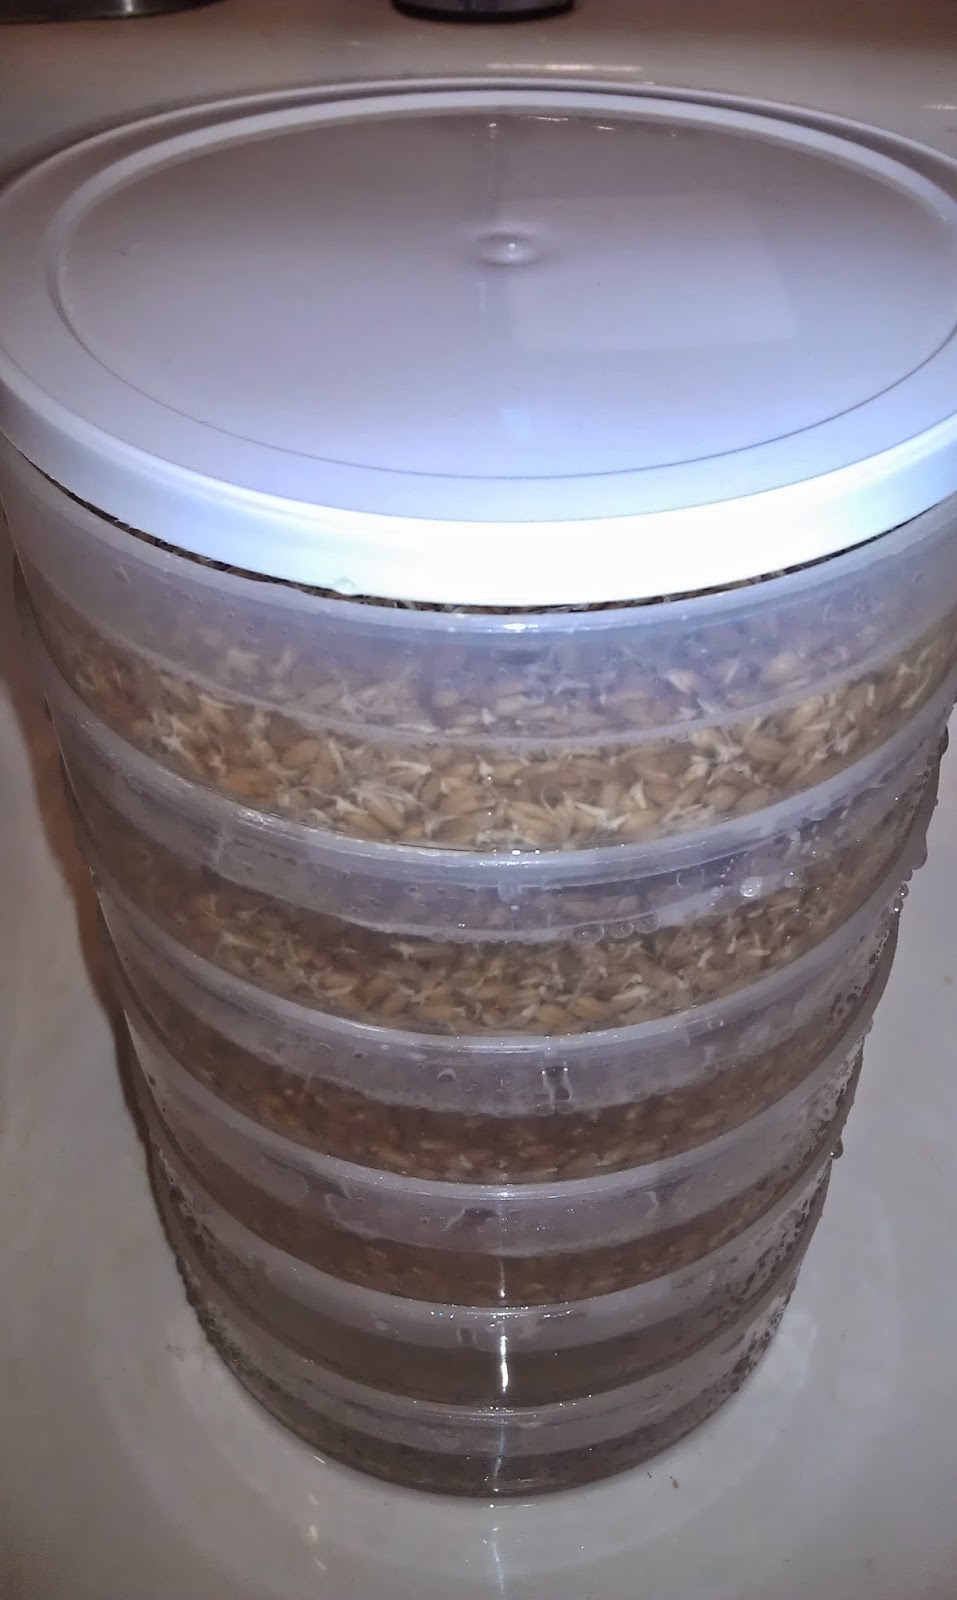
Six Trays Full, draining.


DAY 2:
Repeat Day 1 using 2 new round trays of seeds.  After thoroughly rinsing the new seeds,  stack all round trays from the day before on top and fill them and rinse all of them by slowly filling the top tray with cold water and allowing the water to drain down thru all trays.  Once drained, rinse the white holding tray then, stack all trays on top, lay the lid on the top tray.

Repeat the evening rinse.

DAY 3:
Repeat day 2.  You should now have 6 round trays with seeds/sprouts stacked up with the oldest sets on top and the newest seeds on bottom.

DAY 4 (and daily after this point):
Dump the two round trays of sprouts on top, into one of the black half-size trays. Gently spread the sprouts evenly over the bottom while running cold water over the sprouts.  Thoroughly rinse (flood & drain) the sprouts and allow most of the water to drain from the tray before placing it into the large tray without holes.  Be sure to rinse the large tray without holes before placing the freshly drained half-sized trays back in it after each flood & drain session - this helps to prevent mold growth.

I keep my big trays on a shelf, under a standard shop light in my laundry room, however they will grow almost as well with a bright window exposure, but they tend to lean towards the window.  Simply rotate their direction at each rinsing if that is a problem.

Repeat Days 1 thru 3 in the round sprouting trays. 

Rinse all trays again twice a day.

DAY 5:
Repeat Day 4. You should now have two half-size trays in one large tray, plus maintaining the 6 round sprouting trays.

DAY 6:
Repeat Day 5. You should now have three half-size trays actively growing, plus maintaining the 6 round sprouting trays.

DAY 7:
Repeat Day 6. You should now have 4 half-size trays actively growing, plus maintaining the 6 round sprouting trays.

DAY 8:
Repeat Day 7. You should now have 5 half-size trays actively growing, plus maintaining the 6 round sprouting trays.

DAY 9:
Repeat Day 8. Today you should have 6 half-size trays actively growing in various stages as seen in the picture below, plus maintaining the 6 round sprouting trays.

Grass in Various Stages of Growth


DAY 10:
Gently pull the roots up out of the drain holes in your tallest grassed half-sized growing tray and drop the whole block in the chicken pen.  If you want to split it among your birds you can gently pull it in half, but it isn't necessary, they tear it apart pretty well themselves.  Wash this tray out (or use a clean tray) to repeat starting from Day 4.

You now have all trays full and each new morning you will have a fresh block of Organic Wheat Grass for your chickens!  You can 'mow' this grass and use it to make your own healthy green smoothies too!

Just keep it going and you will never run out.

Keeper of 1 husband, 3 dogs,
3 cats, and 17 Chickens!
 
Follow on Bloglovin

http://www.Facebook.com/backyardchickenlady

This post was included in the HomeAcre Hop at Pint a Size Farm where I am entry #83, and in the From the Farm Blog Hop where I am entry #104..

 .

Thursday, July 11, 2013

Making Compost Tea ~ for your plants to enjoy, not you!

Every time I learn about some new DIY thing, I just have to try it.  Recently while reading about composting (which I want to start doing) I came across an article about making Compost Tea.  Which lead me to another, and another, so I picked up a little information here and a little more there.    Then I decided to try to make my own.

If you want to make compost tea with me you will need to gathered the following items:


First I filled the bucket most of the way up with water from the hose.  Since this is probably chlorinated I put the air hose in the bucket, held down by the rock, and let it bubble for about 4 hours to evaporate the chlorine.  It's important to keep the bucket in a warm location but not in direct sunlight, otherwise you will be promoting algae growth and that is not good for composting tea.  I put mine out on the patio, under full shade.
 

Then I added the compost to the water.  I didn't bag it like some suggested, since I was only making 5 gallons I didn't think this would be necessary.  I added 1 ounce of Molasses and stirred it all up.  Then I placed the tubing at the bottom again, and held it in place with my big rock.  And just let it 'steep'.


Some instructions suggested that I stir it daily, others didn't mention stirring, and since I had such a high powered air pump that was really keeping the water moving, I didn't bother with the stirring.  Three days later my compost 'Tea' was done steeping.  It looked like rich, dark tea coffee, but smelled like poo (not literally like poo, but I am hyper-sensitive to smells).

I turned off and removed the pump and air hose.  Then carried the bucket out to my raised bed garden, splashing some of this nasty smelling tea on my leg...oh joy! 

I then let the tea sit for a about 20 minutes so all the solids sank to the bottom.  You are suppose to then pour it through a strainer and then dilute the tea with 1 part Tea and 10 parts water.  Well, I didn't have any more buckets for this whole straining and diluting process so I modified those instructions.  I advise you to gather 2 buckets in the beginning (one for steeping the tea, one for straining then diluting the tea) so you don't have to make the modifications that I did. 


It is important to use the tea right away because without the air flow, the good microorganisms and fungi will begin to go to sleep.  It is also very important that you do not pour the tea directly on your plant as it could burn your plant.  Since I did not have extra buckets I had to dilute my tea by using a bowl to scoop out some tea, then add water to it before pouring at the base of each plant.  Not a perfect science, but close enough.


I think my plants appreciated the sip of Compost Tea as much as I enjoyed my glass of mint tea that I brewed for myself once this task was complete.


  Keeper of 1 husband, 2 grandkids, 2 dogs,
3 cats, and various Chickens!

Follow on Bloglovin


Did this post stir something inside of you?  Leave me a comment, I would love to know what you're thinking!!!


*Disclosure, this post contains affiliate links.  If you click on my links and make a purchase of these items online, I will receive a very small commission on your purchase.  -Thank you in advance :-)

Saturday, June 8, 2013

My Experiments with Growing Chicken Fodder


In a previous post I told you about building a grazing frame to grow greens inside the chicken run for the chickens to eat.  The frames prevent them from digging up the roots or eating the plants down to the roots so the chickens can 'graze' on the greens throughout the spring and summer months.  Since they will probably not grow well in to the winter months, I have been doing some experimenting with growing fodder so I will be able to keep my chickens in healthy greens throughout the year. 

Two baskets of Fodder in the mini indoor greenhouse.
I have been testing different seeds that I already have around the house to find out which ones sprout the fastest, and with the biggest bang for the chicks buck as far as large, plentiful sprouts go.  First I tested wild rice...not so good.  As you can see here (if you squint your eyes) it takes forever for the rice to sprout and they are very small and tiny.


Wild Rice sprouts after 8 days.

Since I am growing wild bird seed (and pasture grass) in the grazing frame I thought I would test some of the wild bird seed as fodder.  It sprouts pretty fast, here is my test basket after just 2 days.

Wild Bird Seed Sprouts at Day 2

And here it is after 4 days.

Wild Bird Seed Fodder Sprouts Day 4


And here on Day 6.  I went ahead and gave the basket to the chickens.  I went back to check on them in a couple of hours and there was only a few little pieces left in the basket...so I would say they liked it.  I wasn't real impressed with the amount of greens that the wild bird seed produced, but in all fairness I didn't use much seed to begin with.


Another thought as to why the wild bird seed did not do so well for basket fodder is that it grows better in dirt.   I'll keep watching its progress in the grazing frame in the chicken run (where I have planted wild bird seed and pasture grass).  I know that in the past I have been able to grow quite exotic looking plants without trying when if falls from the feeder onto the ground below the bird feeders by the patio.

An interesting note, I seemed to get a lot of gnats inside the greenhouse, mostly in the area of the baskets.  Something about it must have attracted the gnats.  I had the greenhouse outside on the patio because I figured using the A/C indoors would have made it too cool around the greenhouse and inhibited the growth of the sprouts.  Being outside probably contributed to the gnats accumulation as well because I did not have any gnats in the greenhouse when it was indoors used for starting my seedlings for the garden earlier this spring.

Since the greenhouse was outdoors and the temps have been in the upper 90's this week, I think it may have negatively impacted the seed growth.   The high temps required me to rinse them about 3 or 4 times a day to keep the sprouts from getting too dry, where normally I think once or twice a day rinses should be enough.   I will experiment more with growing fodder baskets in the fall when the greenhouse will work more effectively in cooler outdoor temps.

Well, I am off to more experimenting with growing fodder.  I'll keep you posted of my findings.

Keeper of 1 husband, 2 grandkids, 3 dogs,
3 cats, and 17 Chickens!
 
Follow on Bloglovin


Did this post stir something inside of you? If so, Please leave me a comment, I would love to know what you're thinking!!!

Friday, June 7, 2013

Making a Grazing Frame for your Chickens ~Easy DIY Project

Since I don't have grass (or anything green) growing in my yard, not even in the spring or summer, I thought I would try growing some greenery inside the chicken run using a grazing frame.  You may have seen my grazing from in the pictures in an earlier post about Big Red our new flock member.   A grazing frame is basically a wood frame with hardware cloth attached to the top side.  You can either place it over existing grass to allow the chickens to graze that area and enjoy the grass without allowing them to scratch the roots up or devour the patch of greenery altogether.  Or if you are like me and don't have any greens naturally growing, you can plant them and cover the area with a grazing frame to keep the chickens from digging up the seeds while they grow.  The sprouts will grow up and out through the hardware cloth so the chickens can enjoy the parts that stick up out of the frame, but the plant and roots remain safely under the hardware cloth.

I stole some 2x4's that the hubby is using to build a storage shed...he wont miss three little boards will he?  I left two of the board the full 8' lengths.  I cut one 8' board into four 2' lengths.  Then I attached them like this.


I then stapled hardware cloth to the top side.  Then I trimmed off the excess hardware cloth.


I could have used redwood or cedar instead of pine, but I figured if the wood rotted over the next few years and I had to rebuild it, it was still cheaper then spending twice or three times as much on redwood or cedar...besides, the hubby already had this big stack of pine he bought for the storage shed.

I cleared an out-of-the way area inside the chicken run, big enough for the grazing frame.


I laid the grazing frame over that area and pushed the gravel up against the sides of the frame to help keep it in place.  As mentioned earlier, you can plant your seed in the soil then put the frame on top of that, but I was feeling lazy so I put the frame down first.


Then I shoveled my super-soil and manure mixture on top of the hardware cloth so the dirt fell through but the chunks were caught by the tight weave of the cloth.  I tried to make sure the soil inside was some what level but I didn't put a whole lot of effort into it because Perfectionism is something I have outgrown.

 
Then I sprinkled a mixture of equal parts pasture grass seed and wild bird seed (about 1 cup of each) on top of the soil.  Then I added another light layer of soil by hand to gently cover the seeds but not bury them to deeply.  Then I sprinkled water over the entire grazing frame.


A little later Barry and Goldie (my two most curious chicks) did the final inspection.  It met their approval so my work here was done.  Now I just need to water it once or twice a day, depending on the temperatures. 


After 3 days of watering I didn't see any sprouts yet...but on day 4 look what I found!

Day 4 -Spouts appear!

And here are the sprouts on Day 5.  There are several patches throughout the frame like this.  By next week they should be poking up out of the wire for the chickens to nibble on.

Day 5


This grazing frame will allow me to grow fresh greens inside the chicken run for the chickens to eat, while preventing the chickens from being able to dig up the roots or eat the plants down to the roots, so my chickens can 'graze' on their greens throughout the spring and summer months.  I wasn't sure how much seed to apply at first, but now I can see that I needed more.   So I plan to re-seed periodically until this grazing frame is densely filled with green treats for the chicks.

Since this will probably not grow well in to the winter months, I have been experimenting with growing fodder in my mini greenhouse.  I will be sharing what I learn from my experimentation in another post coming up very soon!


Keeper of 1 husband, 2 grandkids, 3 dogs,
3 cats, and 17 Chickens!
 
Follow on Bloglovin


Did this post stir something inside of you? If so, Please leave me a comment, I would love to know what you're thinking!!!
 
This post was also shared in the Creative HomeAcre Hop #19

Wednesday, May 29, 2013

Chicken Dust Bath ~ If you build it, will they come?

It was my hope that if I built a Dust Bath for my chicks, they would actually use it.  Having baby chicks with no adult chickens to teach them, means I either have to teach them myself or rely on instinct to guide them.  I had to consider this when I decided to create a Dust Bath in one area of the chicken run.  The ground in our chicken run is covered with small granite rocks.  I figure that eventually the full-grown chickens will have the rocks turned under in the dirt, but until then it is about 1-2" deep in rocks all over the run, leaving no clear area for dust bathing.  I decided to use a cat litter box, one with the lip at the top in hopes it would keep some of the dirt inside.  I marked the outside edge of the cat box and dug a hole in the ground the depth of the box, leaving the lipped edge above ground.

I filled the new dust bath with a 50/50 mix of dusty super-soil left over from my raised bed garden and sand I got out of the wash down the road.  I added some DE (after lots of debate over the pro's and con's of using DE around the chickens).  I used the litter scooper to remove any small chunks of stuff that might be still in the dirt.  To me it looked like the perfect little dust bath...now I just hoped they would actually use it. I've heard from other chicken keepers how they went through the trouble of making a special place for a dust bath and the chickens wouldn't use it because they liked a spot under a bush much better.


But two days later...


Isn't that so Cool?!?!  I was just sitting in the run watching the chickens scratch around for bugs and what-not, then one of the Rhode Island Reds wondered into the dust bath box and took a bath!  As you can see in the video, all the other chicks followed her lead and they all took their first dust bath.  Just like human babies, they became all tuckered out after taking their bath so they took a nap...right in the bath!

Sleeping babes after their first Dust Bath!

Keeper of 1 husband, 2 grandkids, 3 dogs,
3 cats, and 17 Chickens!
 
Follow on Bloglovin


Did this post stir something inside of you? If so, Please leave me a comment, I would love to know what you're thinking!!!

Tuesday, May 28, 2013

Vacationing with your Peeps! ~Traveling with Chickens, DIY Water Bottle

Have you ever taken a vacation with your chickens?  We did!

We didn't exactly have a choice.  When the chicks were almost 5 weeks old we needed to go out of town for 4 days to our daughters house, which is about a 3 hour drive away.  At their young age, the chicks had only voluntarily gone to bed in the coop for the first time on the night before we were due to leave.  So they still needed me to scoop them up and put them to bed at night.  I friend offered to check on our chicks while we were away but I couldn't ask her to come let them out early each morning then come back and put them away each night.  Besides, she doesn't have chicks so she has no experience catching them to put them away, and twice a day is a bit too much to ask.

So the only option left was to take them with us.  So I got started figuring out how exactly we were going to travel with 8 little chickens.  I figured they could travel in the dog crate that we brought them home in, but this time I needed something to keep them in the crate, and hopefully keep some of the litter in the crate instead of in my van.  I picked up a yard of heavy clear vinyl from JoAnn's Fabric store.  I cut it into 12" strips that I placed inside the crate around the walls.  To keep the vinyl in place I used some zip-ties to attach it to the bars.  In order to attach the zip-ties through the vinyl, I needed to punch some small holes in it.  Since I already had my scissors outside with me, I got the really dumb idea of using them to poke the wholes, rather than taking the time to go inside the house to find an awl.  Why was this a dumb idea?  Because when I was poking my very first hole the heavy vinyl I found it difficult to puncture so I had to apply lots of pressure with the scissors...then it gave way and sliced through my finger on the other side!  OUCH!!

The first thought that went through my head, (right after, "OMG that was stupid!") was, "Uh-Oh, right before slicing my finger open I was just flicking the poopy litter out of my way with my FINGERS!" My second thought was, "Gee, when was my last Tetanus shot?"  I couldn't remember the last shot so I am pretty sure it was well beyond the 10 years recommended for booster shots.  I went in the house and thoroughly cleaned my wound and bandaged it up.  Then I went back outside (with an awl that I had in my sewing room) and finished punching the remaining holes and attaching the vinyl to the crate walls.  Then we made the 45 minute drive into town to get a Tetanus shot.


After we got back home I went back to work on the chicken travel crate.  They needed a portable water source so I decided to make them a mini watering bottle out of a DaSani bottle and a chicken nipple.  
It was really easy to make and a great thing to have on hand in the future if I have to confine a single chicken (or more baby chicks) away from the main Chicken Fountain in the future.   Back before we got our first chick, when I was shopping for waterers I came across chicken nipples, so I bought 6 of them to have on hand in case I might need them in the future.  Good thing because they are not available locally and I didn't have time to buy them at the last moment.  I could have bought a portable watering bottle but they were pricey -the nipples were very cheap and the bottle was free.


Here's how to make your own.  Remove the screw-on cap from a water bottle.  Using a 5/8" drill (the threads on my chicken nipples are 5/8", so check yours first) drill a hole in the center of the cap.  Clean off any plastic bits 'n pieces remaining around the hole.  Wrap the chicken nipple threads with a piece of teflon plumbers tape (being sure it is going in the same direction it screws on).  Then screw the nipple into the hole you drilled in the cap.  The nipple just happened to fit perfectly in my screw driver end so I used it to help screw the nipple in.  Screw it in only until the threaded area is no longer visible, do not over tighten or you might strip out the hole.  Fill the bottle with water, screw on the cap with the chicken nipple. Turn the bottle upside down and poke a tiny hole in the bottom of the bottle (using an awl or tiny drill bit).  This tiny hole will allow air to get in the bottle as the water drips out the nipple.  If you don't put the hole in it the bottle may either collapse as they drink or will not allow more water to drain out when they try to drink.  When refilling the bottle simply place your finger over this hole until you replace the cap and turn the bottle back upside down.

At first I used light wire to attach the bottle to the crate door, but I realized that was going to be a problem every time I needed to refill the bottle, so I replaced that with a loosely zipped zip-tie and two pieces of elastic pinned together to hold the bottle in the right position.


With the dog crate travel-ready, we loaded up the chicks and headed out.  Once we arrived at our daughters we placed the crate inside the 6'x6' chain-link dog kennel and let the chicks out.  To prevent the tiny chicks from simply walking out the chain link I wrapped the bottom 2' with chicken wire.  We then put blocks around the bottom and two pieces of plywood on the top to keep stray cats (or the squirrel overhead) from getting into the kennel area. Then we posted my Boston Terrier 'Piggy' on guard duty.  She loves to chase any cat that moves -other than our own.  Each evening I put the chicks back in the dog crate and we took them inside with us.  Each morning we took them back out to the kennel.  This worked out pretty well except I think the chicks doubled in size during that 4 days (Seriously) so they seemed to be getting a little cramped.


When we finally arrived back home I took the chicks (still in the crate) out to the chicken run.  The last hour of the drive they were making quite a racket so I know they were sick of being cooped up in such a small space.  When I opened the crate door they immediately ran out in flying leaps, peeping like crazy with excitement.  They ran around the chicken run, over to the food and water, then in and out of the coop as excited as kids on Christmas morning!  I could tell they were so thrilled to be back in their big yard and so happy to realize that the dog kennel was not their permanent home.  When it was getting dark they came to me to put them to bed.  Even the Rhode Island Reds came up to me and let me pick them up.  They always run from me so this was totally out of character for them.

I little later I went out to check on them and found them all sitting on their perch for the first time.  "Home Sweet Home" was definitely the mood tonight.

Keeper of 1 husband, 2 grandkids, 3 dogs,
3 cats, and 17 Chickens!
 
Follow on Bloglovin


Did this post stir something inside of you? If so, Please leave me a comment, I would love to know what you're thinking!!!

Monday, May 27, 2013

I Now Have the Perfect Watering System, thanks to The Chicken Fountain! ~Product Review

I wanted our chicks to never have to drink old stale, hot, poopy water.  I also never wanted to worry that I (or a chicken sitter) might forget to check their water container and let them run out, especially in the hot summer months.  So before I even brought home my first chicken I did some research on the internet (what did we do before the internet?).  I talked to other chicken keepers about what watering system they used, I've read every blog post I could find about chicken waterers, and I've studied the products they suggested.  Somewhere during my search I read a review on The Chicken Fountain.  I wish I could remember which blog I first read this on to give them credit, but I read several and now can't remember which was that first to tell me about the Chicken Fountain.


When I first read about it I said to myself, "Now that would resolve all of my concerns right there!" So I googled "Chicken Fountain" and not only found the company but other reviews for this product.  After reading as much as I could about the Chicken Fountain I decided it was the product for me and my chickens.  I ordered one, even before I had the chicken run built or owned a single chicken. I ordered the Standard Size that is designed for use by 4-16 birds, but they also have a mini and a mega size as well.

It arrived a few days before we got our first chickens.  I read through the instructions and thought my husband would have no problem installing this for me.  But as it turned out, he was stuck on a job the first day the new chicks were home so he wasn't going to be able to install the Chicken Fountain for me.  So either they were going to have to wait or I was going to have to build and install this thing myself. Now keep in mind that my husband is a retired mechanic and a general contractor...and I am not!  But the instructions made it look so simple that I thought I had to at least give it a try.  The manufacturer had very detailed instructions and everything I would need was included with the fountain, including the PVC glue! All I needed was a hammer, tape measure, level, and maybe a screw driver.  What I lack in mechanical skills, I make up for in over-confidence with a new challenge...maybe not always a good thing.

I was able to assemble the (mostly pre-assembled) Chicken Fountain in a matter of minutes. The installation took a little longer because the hubby asked me to not mount anything on the cement siding board on the side of the house (which serves as one wall of the chicken run). But that was the only location that would have sun for about an hour in the morning then shade the entire rest of the day.  It was the perfect location for the Chicken Fountain!  'Creative" is practically my middle name, so I decided to mount the Chicken Fountain to a piece of plywood, then stand the plywood up against the side of the house. I found some old closet rod supports that made great "L" brackets for the bottom to hold the plywood upright so it could be freestanding and therefore portable if I ever wanted to move the fountain to a new location.

I had some trouble getting the nails provided with the fountain to penetrate the old, dried piece of plywood.  One wouldn't go in and the next one bent on me, Grr!  I do happen to own my own power drill so I grabbed it and a few screws the same size as the nails and screwed the "J" brackets (that hold the Chicken Fountain) to the plywood.  Then I attached the hose and turned on the water.  In my excitement to test the fountain I forgot the instruction that said to turn the water on 'Very Slowly" when first filling the fountain, so the cap went flying up in the air.  It was quite funny actually, even though me and the chicks were the only ones around to see it. I went and put it back in place and then turned the water back on -slowly this time.  I had to make a minor adjustment to the internal water level screw (instructions were included about how to make this easy adjustment) and moments later I had a fully functioning Chicken Fountain!  

My only problem now was that I mounted the fountain at a height to accommodate adult chickens.  Mine were only 3-1/2 weeks old so they were not even close to the nipples.  I needed to either lower the fountain temporarily or raise the ground.  So I placed some large rocks under the fountain ends, topped those with scraps of plywood, then piled on some gravel until the 'mountain' was just the right height for the baby chicks to walk up on and reach the nipples.  I figure that as they get a little older I will just gradually knock some of the gravel down then remove the plywood and big rocks underneath by the time they are adults.  In the future if I have babies I can make a new 'gravel mountain' at one end just for them.

My Gravel Mountain to get the chicks up to the fountain nipples.
Now it was time to get the baby chicks to use the fountain.  Since I did not have adult chickens to show them how to drink, I had to do it myself.  At first I used the supplied rubber-band to hold one nipple open to run a little stream of water to get their attention.  It seemed to only scare them.  I worried about them getting too thirsty so I placed a bowl under the stream to give them water to drink until they learned to use the nipples. Mistake!  They would look at the water dripping, but drink from the bowl instead.  So I took away the bowl and placed each chick at the water fountain one-by-one so they could see it and walk away if they chose to.  But at least now they would know where the water was if they got thirsty.

Very shortly one of the Barred Rocks (who I think might be a Roo by the way) walked to the fountain, pecked at the red nipple, got some water on her/his beak and began pecking and drinking more.  Within moments the others were so curious that they each came up my gravel mountains and pecked at the nipples as well.  That was all the training they needed.  They've been using the Chicken Fountain exclusively ever since.  I'm happy, and they seem to be happy as well.

Here are the baby chicks using the fountain.  This was taken on day one!  (In this video you will see my PVC feeder [see the DIY instructions here] mounted on the front of the Chicken Fountain...I thought it best to keep food and water close together.  That may change as they get older.)


If you don't like the idea of your chickens drinking poopy water, or you're tired of the chore of cleaning and refilling your water containers all too often, then you should seriously consider the Chicken Fountain.  It works exactly like it's suppose to and even has a special port at the top to add ACV (apple cider vinegar) or other medications.  The size that I got holds 1-1/2 gallons of water so you add the medication or ACV for that quantity of water, shut off the water so as they drink it, it will not be further diluted.  Then just monitor the water level until the medication has all been consumed.  Then turn the water back on (slowly) and they get fresh water again.

The company has Awesome customer support (replies to your emails really fast), and they include everything you need in the box.  I even sent them feedback about their product with some issues that I ran into (because of my own lack of mechanical skills) and they not only took the feedback in a positive way, they used it to improve their already great instructions for future customers, who like me, might need a little extra explanation.  I highly recommend the Chicken Fountain!

Disclaimer: I was not compensated in any way for this product review.  I was not given a product to test and review.  I simply bought a great product that I wanted to share with other chicken keepers.


Keeper of 1 husband, 2 grandkids, 3 dogs,
3 cats, and 17 Chickens!
 
Follow on Bloglovin


Did this post stir something inside of you? If so, Please leave me a comment, I would love to know what you're thinking!!!

Sunday, May 26, 2013

DIY Chicken Feeder ~ Easily Make it Yourself with PVC

One thing I hear quite often from backyard chicken keepers is the complaint that their chickens either poop in the feed dish or spill it all over the place.  Since I'm starting out with new chicks, I wanted to start out on the right foot by finding a feeder that would not allow them to get into it or onto it to poop in the food and I certainly didn't want them spilling it on the ground.  Feed is rather inexpensive, but not so much that you can afford to lose half of it to waste.  So once again I went on a search of the chicken forums that I belong to, to find out what might work for me.

After looking at several PVC feeders I settled on a final design that I got from a fellow chicken keeper called "appps" on the Backyard Chickens forum.  This design holds about 10 lbs of of feed (depending on how long you make the vertical tube) and has two feeder holes with a slight (22 degree) bend to prevent the chickens from accidentally scooping out more food then they can eat.  I went shopping for the parts but my limited knowledge about plumbing parts caused me to get parts that wouldn't work together.  On my next trip to the hardware store I took the hubby along.

Our Shopping List: (All parts are 3" white PVC)

(1) 5' length of pipe (they cut the pipe to the size I needed)
(1 ) "T"
(2) 90 degree Elbows
(1) Cap
PVC cement (which we already had)

How to assemble: (see Image #1 below for the finished product)

1.) Cut off two 3" long pieces from the 5' pipe. (needed to join the Elbows to the "T")
2.) Apply the PVC cement into one of the side holes of the "T" and quickly place one of the 3" long pipe pieces in the hole.  Work quickly because this stuff becomes solid almost instantly.  Then repeat for the other side.
3.) Dry-fit (do not cement yet) the Elbows onto the 3" pipe stubs.  Turn the Elbows in a slightly upward & forward position about a 22 degrees forward.
4.) With a Sharpie or other black marker, make a line on the Elbow pieces and directly across to the joining part of the "T".  This will help you quickly get the right angle when you are actually gluing the parts together in the next step.
5.) Now use the PVC cement to glue the pieces together in step 4.
6.) Glue the long pipe in the top hole of the "T".
7.) (Optional) Turn the cap upside-down and Carefully cut four slots in the sides of the cap. (this helped me to keep the cap from getting too snug on the pipe) (see Image #2)
8.) Install the feeder where you want it, (I used wire) strapped in two or more places s that it not only holds it up at the level you desire, but also supports the tall tube so it doesn't move.  Make sure there is sufficient room at the top to allow access for refilling.  If it is too tall, you can always cut off a bit of the tube.  Also make sure the feed bowls are no higher than chest-high of your shortest chicken.
9.) Fill the tube with your desired chicken feed and place the cap on top...Do NOT force the cap on because you will need to get it off when its time for refilling.  

Image #1 (finished product)
 
Image #2 Cap with slits cut.
Since my chicks were spending most of their time in the coop still, I installed my feeder inside and right on the floor.  A few days later I moved it outside and attached it to my watering system (see next post). The chicks had no problems reaching the food, even when the food level was down very low. Sometimes (probably because of humidity or the compaction of the feed) it takes a little extra pecking at the food at the bottom before the feed in the tube loses its battle with gravity and falls down into the bowls.  The chicks can always reach the food in the bottom even when it seems really low, then all of a sudden it will give way in the tube and pile up higher in the holes, but never overfills the feeding bowls.  Unlike other PVC feeders, this design with the 22 degree angles and deeper bowls, also prevents the chicks from scooping out more food than they are eating. 

I plan to build a roof or cover over the feed tube area when it starts approaching monsoon season so the food does not get wet in the holes.  Even if it did get a little wet though, it wont get the food up in the tube wet so once the chicks eat away at the wet food, the new dry food will come tumbling down for them.

This was a very easy project that just about anyone could do, but if you are not familiar with the plumbing parts, take a picture of this with you to the hardware store and they will be able to get you everything you need so the parts will work together properly.  This will save you the time I wasted returning to get the right parts.
  

Well with the feeder done, time to work on the waterer.  Please come back soon to see how I found the Perfect Watering System for my chicks!

Keeper of 1 husband, 2 grandkids, 3 dogs,
3 cats, and 17 Chickens!
 
Follow on Bloglovin


Did this post stir something inside of you? If so, Please leave me a comment, I would love to know what you're thinking!!!