Showing posts with label Chicken Treats. Show all posts

Thursday, September 11, 2014

I Grow Wheat Grass for 17 Chickens for Less than 25 Cents a Day - Instructions

Last year I shared with you one of my fodder growing experiments.  It didn't turn out so well, but I continued to play with several of the factors that made it less then wonderful, such as the kind of seeds I would grow, the trays needed for optimum sprouting and ultimately grass growing, temperature and location of my trays, and finally the rotation schedule that would provide me with the exact amount of feed I would need every day for my hens.

All of my experimentation has helped me develop a master-plan that I would like to share with you.  I've been using this plan successfully for almost a year.  With this method I can grow enough Organic Wheat Grass to feed (as a supplement) to my 17 hens during the times of year when access to fresh grass is not an option...which is most of the year here in ArizonaI can do this for less than 25 cents per day!  This does not include the initial cost of my supplies however.  If you want the same supplies I used, I have included links to purchase these items online, below.


Beautiful Organic Wheat Grass in Various Stages of Growth

Here are the detailed instructions for my super-easy, proven method:


First, I bought Two (2) Victorio Seed Sprouter sets - that gives me a total of 8 round sprouting trays.   I have six trays in my rotation at all times and two trays are cleaned and ready each new day.


Next I bought the big trays I use for days 4 thru 9.  You will need Three (3) Large Trays Without Holes and Six (6) Half-Size Trays With Holes.  I bought an extra couple so I don't have to immediately wash out the tray emptied each day, but it really isn't that much of a chore.  I figured I could use the extras for my garden seedlings.  The reason I don't use these black trays from the beginning is because, until the seeds sprout, they can too easily fall thru the drain holes, and they also sprout better in the round Victorio trays in my opinion.  (Click the title under each image to be taken to the Wheat Grass Kit website to purchase the trays.)

Large Trays WITHOUT Holes

Small (10"x10") Trays WITH Holes
I use Organic Hard Winter Wheat Berries (seeds).  I purchase my seeds through a co-op bulk feed group here in Arizona for about $16 for a 25 pound bag.  If I run out before the next order time I also purchase them in the bulk section of my local natural grocery for $ .99 per pound.  Yes, I could buy it much cheaper at the feed store BUT, it wont be Organic, Non-GMO which is all I will feed my hens.  For less than 25 cents a day I am not concerned about the cost to purchase the best seeds possible.  I have also found through my experimenting that the standard bulk seeds which are not organic do not sprout as well so you are using lots more seeds and getting less growth...where is the savings in that?

Here is my routine:

If you start with Day 1 step (below) each day, by the time you get to the 10th day you will have a 10" x 10" patch of lush green wheat grass to feed your chickens.  Keep it up and you will always have a fresh batch daily from there on out.

1/3 Cup of Organic Hard Wheat Berries (seeds)


DAY 1: (and each morning thereafter)
Each morning you will be starting a new set of round trays.  Put 1/3 cup of wheat seeds in each of 2 round Victorio sprouting trays.  Rinse them thoroughly under cold running water, then allow to drain. The theory is "Flood & Drain".  After I rinse the new seeds thoroughly I put these two trays on the bottom of my existing stack of trays. (Note: when you first start you wont have an existing stack, but by day 2 you will.)

I place the whole stack of trays into the sink and slowly run cold water into the top tray, and allow it to run until all of the trays are full of water.  Then I lay the lid on top -but do not snap it down, if you do it can cause molding because they cannot drain.  While that is draining I rinse out the holding tray (that's the bottom white tray without holes).  Once the water has pretty much drained out of the trays, I put the whole stack (6 trays by day 3 and each day thereafter) on top of the white holding tray and place it on my counter out of my way.

In the evening I will 'flood and drain' all trays again.  The seeds should be rinsed approx every 12 hours, it's not exact, I do it in the morning, then sometime after dinner or before bed.
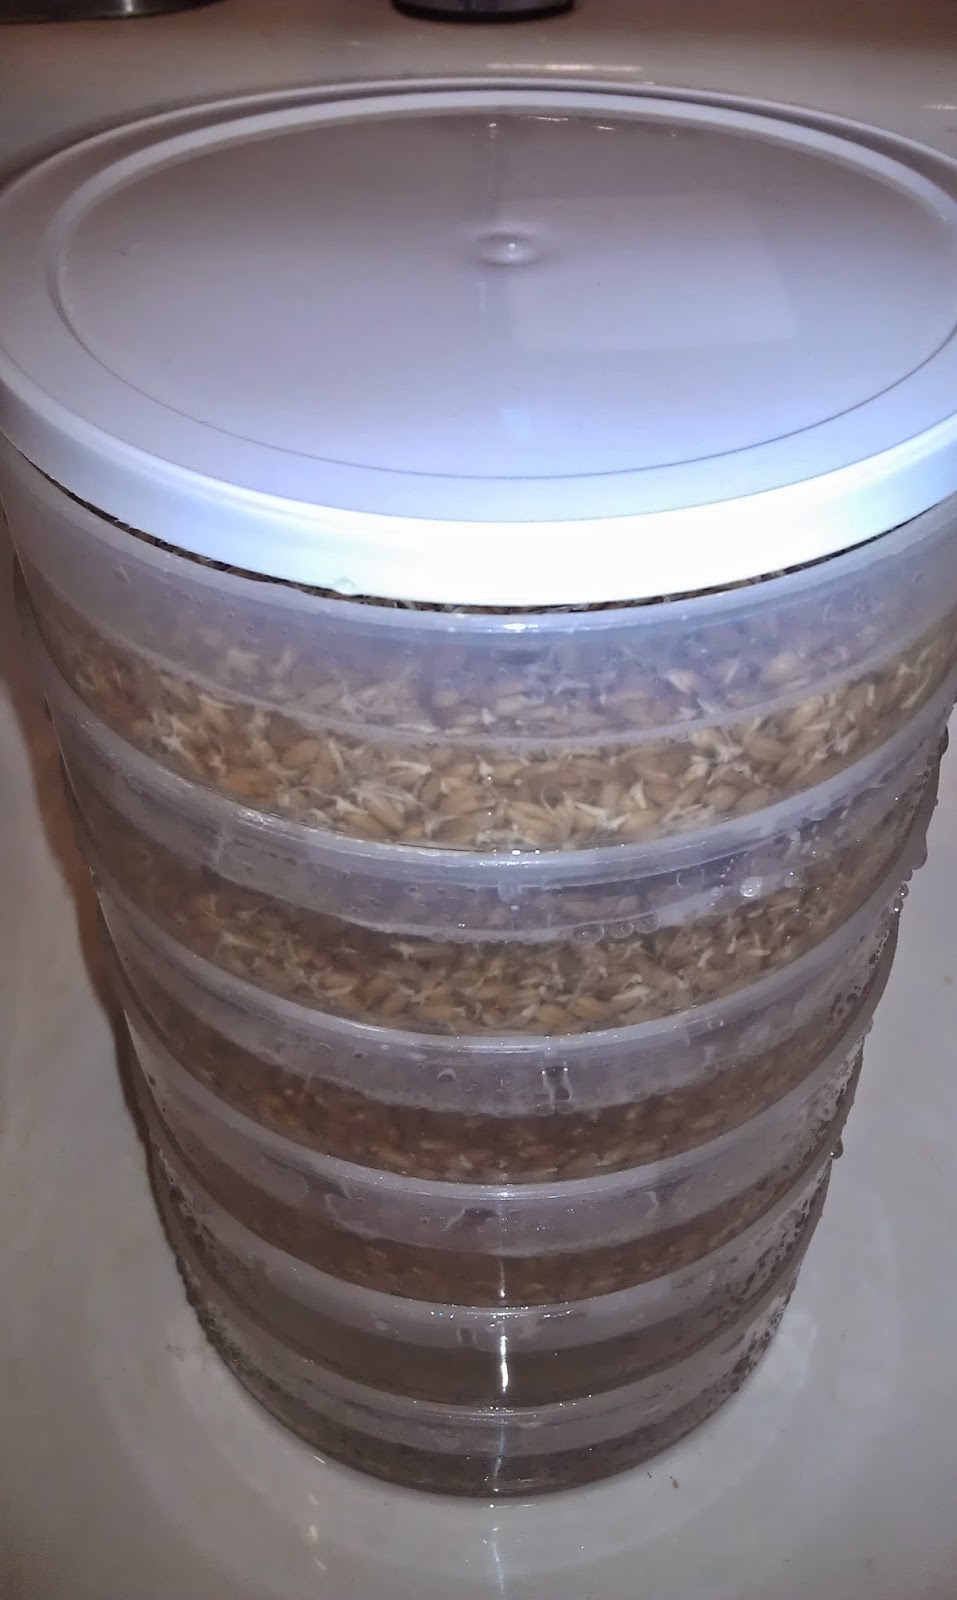
Six Trays Full, draining.


DAY 2:
Repeat Day 1 using 2 new round trays of seeds.  After thoroughly rinsing the new seeds,  stack all round trays from the day before on top and fill them and rinse all of them by slowly filling the top tray with cold water and allowing the water to drain down thru all trays.  Once drained, rinse the white holding tray then, stack all trays on top, lay the lid on the top tray.

Repeat the evening rinse.

DAY 3:
Repeat day 2.  You should now have 6 round trays with seeds/sprouts stacked up with the oldest sets on top and the newest seeds on bottom.

DAY 4 (and daily after this point):
Dump the two round trays of sprouts on top, into one of the black half-size trays. Gently spread the sprouts evenly over the bottom while running cold water over the sprouts.  Thoroughly rinse (flood & drain) the sprouts and allow most of the water to drain from the tray before placing it into the large tray without holes.  Be sure to rinse the large tray without holes before placing the freshly drained half-sized trays back in it after each flood & drain session - this helps to prevent mold growth.

I keep my big trays on a shelf, under a standard shop light in my laundry room, however they will grow almost as well with a bright window exposure, but they tend to lean towards the window.  Simply rotate their direction at each rinsing if that is a problem.

Repeat Days 1 thru 3 in the round sprouting trays. 

Rinse all trays again twice a day.

DAY 5:
Repeat Day 4. You should now have two half-size trays in one large tray, plus maintaining the 6 round sprouting trays.

DAY 6:
Repeat Day 5. You should now have three half-size trays actively growing, plus maintaining the 6 round sprouting trays.

DAY 7:
Repeat Day 6. You should now have 4 half-size trays actively growing, plus maintaining the 6 round sprouting trays.

DAY 8:
Repeat Day 7. You should now have 5 half-size trays actively growing, plus maintaining the 6 round sprouting trays.

DAY 9:
Repeat Day 8. Today you should have 6 half-size trays actively growing in various stages as seen in the picture below, plus maintaining the 6 round sprouting trays.

Grass in Various Stages of Growth


DAY 10:
Gently pull the roots up out of the drain holes in your tallest grassed half-sized growing tray and drop the whole block in the chicken pen.  If you want to split it among your birds you can gently pull it in half, but it isn't necessary, they tear it apart pretty well themselves.  Wash this tray out (or use a clean tray) to repeat starting from Day 4.

You now have all trays full and each new morning you will have a fresh block of Organic Wheat Grass for your chickens!  You can 'mow' this grass and use it to make your own healthy green smoothies too!

Just keep it going and you will never run out.

Keeper of 1 husband, 3 dogs,
3 cats, and 17 Chickens!
 
Follow on Bloglovin

http://www.Facebook.com/backyardchickenlady

This post was included in the HomeAcre Hop at Pint a Size Farm where I am entry #83, and in the From the Farm Blog Hop where I am entry #104..

 .

Tuesday, August 5, 2014

Chicken Gym ~ Cabbage Jump (Video)


You know how 5 minutes after summer break begins, the kids start complaining how they are 'So Bored!', well my chickens are no different then kids.  When we were on vacation in Colorado earlier this year the 'girls' were so excited the first day about chasing down all the new bugs that had moved into their run since our last visit.  The next day they lavished on all the weeds that grew up in their area with the help of all the chicken poop they left behind last time. But by the third day the bugs were either eaten up or smart enough to stay outside the fenced area and the grass had been devoured and the roots scratched up.  The chickens looked So Bored.  They had already put that fresh earth to use dust bathing all morning, then by late afternoon they were just laying around in the shade doing nothing.

I knew that if I didn't do something to entertain them they would get so bored over the remaining 11 days of our vacation that they would start bickering with each other.  So I tried to think of some way to get them busy, but I didn't want to have to be actively doing the entertaining myself...it was my vacation too ya know.  

I came up with this...a Chicken Gym!  Check out the 'girls' doing the Cabbage Dance in my video.  I swear I got more entertainment then they did...


[If the video is blurry you can click on the settings icon and adjust it to a higher resolution.]

Is that the just funniest thing?  I changed the music because the wind was blowing and it sounded horrible on the video, I kind of like the music, it is called 'Chicken Dance', very appropriate I think.  I loved watching their little legs flare out to the sides as they jumped up to the cabbage. This was so much fun for me!

What do you do to entertain your chickens?  Or is that entertain yourself with your chickens?


The 'girls' got hours of exercise, they enjoyed the 'treats of their labor', and I was just laughing my butt off.  And, we did it all for just the cost of a .69 cent head of cabbage.  I already had the jute twine laying around.

Here are the Easy Peasy instructions to make your own Chicken Gym:


You need:

A vegetable or fruit that wont immediately fall apart.  I found that cabbage is best but you can use a head of lettuce as well, or a large cucumber, zucchini, apples that are cored, use your imagination.

Twine 

1/2" Paddle Drill Bit (really, any drill bit long enough to go through at least half the width of the veggie will work.

This is what you do:

Drill all the way through the thickest part of the veggie. If your drill bit is not long enough you can drill halfway through, then turn over and drill the opposite side until the two holes meet in the middle.

Poke the twine through the veggie (I doubled mine for more strength since the cabbage was pretty heavy.

Tie the ends of the twine above where the chickens will be 'working out'.  At home they have an arbor top in their run so I tie to that, on vacation we just had chain link fence panels and no top so I first tied a string across the top of two panels then tied the cabbage string to that horizontal string.

Important...you want to adjust the height of the cabbage so that it is just above the reach of the tallest chicken, this way they have to actually jump to peck a piece of it off.  You may want to start with it right at the end of their reach to get them started, then raise it a few more inches after they know what to do.  Mine now always know what to do so I keep it higher right from the start.

 No go build a Gym for Your Chickens!


Keeper of 1 husband, 2 grandkids, 3 dogs,
3 cats, and 17 Chickens!

 
Follow on Bloglovin


Did this post stir something inside of you? If so, Please leave me a comment, I would love to know what you're thinking!!!

This post was included in the Simple Saturdays Blog Hop

Friday, June 21, 2013

Fruit and Veggie Freezer Cake Treats for your Chickens

When I can make a healthy snack for my chickens, I feel good about that.  When I can clean out my freezer and get rid of all of those last little bits of veggies and fruit left over in a multitude of nearly empty bags, or toss the ones that are all frostbitten (and therefore not edible by me), I food good about that too.  But when I can combine those two things, I feel really good!

Yesterday I did just that.  I read a post at Homgrown on the Hill where Mary was making 'Confetti Treat Ice Wreath' based on a recipe that she got from Kathy at Fresh Eggs Daily.  Basically you use a bundt cake pan to make frozen fruit and veggie treats for your chickens to eat on hot days.  It helps to keep them cool plus it's nutritious too.  Kathy suggested that you go through your freezer looking for those little bits of frozen veggies and fruits left over, and if you don't have enough now, start collecting little bits of veggie left overs in a bag or bowl in the freezer until you do have enough to make this frozen treat. 

I love this idea!  Who doesn't have something left over in the freezer that really should be tossed.  Or the last spoonful of veggies left over after dinner -not enough to put away, but too much to just throw away (not that we would do that since we have chickens who love leftovers), but you get the idea.

I used this idea as the motivation to clean out my fridge and freezer yesterday.  I had a surprisingly lot of fruits and veggies tucked away here and there.  I had one bag of California Veggie Mix (cauliflower, carrots, and broccoli) that I never even opened.  It was an off brand so I didn't recognize the bag and apparently ignored it for a long while.  The contents were a bit frosty, but perfectly fine for the chickens to nibble on.

So I tossed all of this into a big bowl and let it thaw out enough that I could mix it up.  I could have put it into a large bundt cake pan as Kathy and Mary did, but my chickens are young and just learning about fresh foods, so they tend to be afraid of whatever I give them the first time or two, then they look forward to it by about the third time I offer it, so I didn't want to waste a big block of frozen goodies.  Instead I used my Giant Muffin Pan with 6 giant cups that will hold about two cups each.  Then I added a little water to bring the level up just below the tops.  And I popped this into the freezer overnight.


Here's one of my frozen cakes ready to be served.  It looks good enough to eat myself...well almost.


I tossed the remaining 5 frozen cakes in to a one gallon Ziploc to be served up later in the week.


I can offer one (or more as needed) on hot days to help the chickens stay cool, while dinning on healthy treats.  Just place the frozen treat (no matter which size you decide to make) onto a dish and place it in the shade where the chickens can enjoy it longer.

My mix included broccoli, cauliflower, carrots, bananas, cooked potatoes, apricots, peaches, celery, and diced apples.  Who knows what my next batch will have, that's the beauty of this treat...its whatever you have in your fridge.

Now lets see what the chickens think of it... Big Red and Barry are always the first to check out any new treats I bring.  Big Red quickly discovered that if she pecks at the colorful spots on the side she gets a cool, tasty tidbit.

Big Red and Barry checking out the new Frozen Treat.
Once Big Red and Barry have given it a few pecks everyone else comes to check out this strange new treat.  There was a little bit of bickering after everyone got in a few pecks at the treat.  Then Big Red ran everyone off (as usual) so she and Barry could have it all to themselves.  But the others are pretty quick so they kept coming back and pecking on the sides (using Barry as a shield between themselves and Big Red).   Big Red finally took a break and the others went to town on it.  I think she got a brain-freeze from eating it so fast.  I would say it was a hit.  They ate most of it before it even had a chance to thaw, so tomorrow I'll bring out two of them.


Do you have some old fruits and veggies in your freezer or refrigerator that you could use to make a Freezer Cake for your chickens?  Go take a look, I was surprised by how much I was able to come up with...and it made so much more room in my freezer too!

Check out the Cool Treat Christine at "A Fly on Our (Chicken Coop) Wall" created.  Thanks for sharing this post Christine, you are a sweetie! 


Keeper of 1 husband, 2 grandkids, 3 dogs,
3 cats, and 17 Chickens!
 
Follow on Bloglovin


Did this post stir something inside of you? If so, Please leave me a comment, I would love to know what you're thinking!!!

Thursday, June 20, 2013

I'm Raising Mealworms ~ Gross, Yet So Fascinating!

I seriously never thought I would say this but...I am raising mealworms!  I wanted to provide my chickens with a great source of protein, and mealworms are the easiest way to do that, but they can be kind of an expensive treat.  I've seen so many other chicken keepers who are raising their own and thought it was just gross!  I also worried about the beetles getting out of the plastic box and raiding my house!  I have enough trouble keeping the crickets under control, I certainly didn't want to introduce a new insect in my house.


Because I'm a naturally curious person, I kept reading blog & forum posts about how easy it is to raise mealworms and how the darkling beetle doesn't fly and cannot crawl up the smooth walls of the plastic tubs.  And most importantly, how you don't have to actually touch them with your hands!  That part creeped me out the most.  So I decided to give it a try.  At the very least, I could just feed them to my chickens and be done with it if I didn't like it.

So I ordered 3000 mealworms. I don't do things small once I set my mind to it.  I ordered them from Exotic Nutrition for what I guess is a reasonable price.   I was concerned about them surviving the shipping with the heat of Arizona and all, so I added three ice packs with my order.  They were to ship via Priority Mail and with this distance I expected them in about 3 days.  They actually arrived on the second day so I was happy about that.  The ice packs were no longer cold, so its good they didn't have to spend another hot day in transit.


I opened the cloth bag that held the mealworms and looked inside.  They looked gross, but pretty harmless hiding in the wads of newspaper inside.  I sat the box on the table and went to gather my plastic tubs that I bought the day before.  I probably should have closed the bag back, because when I returned only minutes later the mealworms were crawling out of the bag!!! Eeeck!  I freaked just a little, then grabbed the cloth bag and dropped it in the tub.  This way as they crawled out they would be confined to the tub.


The previous night I froze my box of oatmeal because I read that doing this will kill any insects that might have laid eggs at the factory (kind of an icky thought).


Then I pour the oatmeal in my little processor and started chopping it up finely.  I read this was a good idea, but in hindsight I don't think it was necessary.


Then I poured the freshly ground oatmeal into the tub.  By this time the mealworms were really coming out of the bag.  I pulled the wads of newspaper out of the bag and spent the next half and hour knocking the worms off the newspapers.  This was another thing that in hindsight was not necessary because they actually like wads of newspaper in their tub.


Once all the mealworms were safely in the tub I added some cardboard and laid out a few pieces of carrots on the cardboard.  The worms were on it so fast!  They must have been pretty thirsty (they get their only source of water from these veggies).

Mealworms going crazy over an apple.

About two hours later they have eaten all the way through the apple.
Over the next few days they continued to devour the carrots, apples, what ever I put in there.  After a few days they slowed down on the carrots so they must have finally quenched their thirst.

I have since realized that my small tubs were not big enough for 3000 mealies so I upgraded them to a much larger tub.  I am using the smaller tubs to house the Pupae and beetles separately because I have read that they will eat their own eggs sometimes, and that would defeat the purpose of raising them if they eat their offspring.

I cut the bottom out of one tub and attached a piece of screen over the opening (held in place with silicone) and then positioned that tub directly above another topless tub so the eggs (that are so tiny you almost cannot see them) and newly hatched worms, can fall through the screen into the other tub, safely out of the reach of the beetles.


 So far I have watched the mealies growing and growing.  They shed their skin with each new growth stage.  And in only about 2 weeks I have already scooped 123 Pupae out of the big tub and moved them into the beetle tub. (Update: within 24 hours of this post going live my Pupae count is now almost 200, and 3 beetles.  Perhaps my colony is on the brink of a serious population growth!)


And look, just today I discovered two beetles!  (They move really fast so I could only get one of them in the picture.)


I hope its a boy and a girl so they can get busy laying eggs!  Soon the other pupae will turn in to beetles too, and they will begin to breed and lay eggs that will produce more mealworms.  Here is a diagram of the mealworm life cycle.  Pretty amazing!

From GliderPedia.com a great source for learning about mealworms.


Okay I know I was so repulsed by these before I actually got them...well even when they first arrived I was still pretty grossed out.  But now I am so fascinated by them that I don't miss a day of checking in on them.   I am totally mesmerized by their transformation.  But I still will not touch them with my hands...I use spoons and forks to dig through their bedding and move them from one tub to another.

I have been scooping out some dead ones, and some live ones too, to feed to the chickens.  They act like I am giving them chicken-crack or something!  I always use a specific dish to bring them out to the chickens and they now recognize that dish.  I have tried to take a picture of them eating the worms but they are gone so fast I haven't had time to even snap a picture.

I'll keep you updated on their progress.  I'm excited to see my first new generation of mealies to come from this colony.  I will be so excited to share that with you...the hubby doesn't want to know about it.  I think he is wondering what happened to his wife.  In the last six months I have become a chicken keeper, a gardener, a self-sufficiency student, turned my kitchen counters into herb and sprout growing factories, and now I'm a mealworm farmer.  He is happy that I get so much joy out of these things, but it's all new to him.  I told him I grew up on a farm and wanted to live that lifestyle again...but in our 10 years together he probably started to think it was all just wishful thinking on my part.   It was actually, but now that wishful thinking has become a reality.

So tell me, what you are doing to make your dreams a reality...


Keeper of 1 husband, 2 grandkids, 3 dogs,
3 cats, and 17 Chickens!
 
Follow on Bloglovin


Did this post stir something inside of you? If so, Please leave me a comment, I would love to know what you're thinking!!!